It's time to build a path with Journey Canvas. This is where you weave the strands of your previous work–audiences, creatives, and trackers–into ready-to-publish campaigns.
The workflow in this demo models a simple use case: a client wants to build a multi-stage public service campaign to create awareness and build an email list. You'll learn how to customize targeting parameters and set up parallel campaign paths for RTB and Deals inventories.
- Working on Classic Canvas? Heads up! You're in the wrong place. Click to learn about Classic Canvas campaigns and tactics.
Prerequisites
This article references digital assets (i.e. audience, mapping, and pixels) created in other articles that are part of the Journey Canvas Quickstart guide. Ideally, you're reading that guide and are working diligently to follow the steps in sequence. If not, no worries. Just click the links in this text, create the assets, and come back to this page.
Tour the workflow
View the workflow from start to finish in a minute or less.
TOC
Here's a clickable list of links to the core sections in this article.
- Opening the canvas
- Building a framework
- Adding conditions
- Customizing targeting parameters
- Managing budget and scheduling
- Publishing and reporting
Opening the canvas
There are two ways to open Journey Canvas. The best approach depends on your starting position.
New campaigns
If you are building a new campaign, the path to the canvas is direct and obvious. Go to the top menu bar and click the Journeys link. On the new page, click the New Journey button and fill in a couple of forms (see the Journey Canvas Quickstart guide for details). After you complete the forms, a blank canvas displays.
Go to the left-hand panel and expand the Toolbox folder. Go to the Campaign heading and drag an option to the stage. In this example, I select the Open Web path.
- On Journey Canvas, a path is a digital box that holds one or more steps. A step is an element that holds creatives (e.g. display or video) with customizable settings and conditions.

Existing campaigns
If you’re working on an existing campaign, go to the Journeys page and click a campaign name or click the Canvas button.

The canvas displays your work in progress.
Building a framework
For this demo, I’ll assume you're new to the canvas experience and have one empty step on the Awareness stage. Now, let's add two creative asset placeholders: one for display and one for video. I call them placeholders because the tiles you drag over from the Toolbox folder are basically empty widgets that you fill with digital assets.
Go to the side menu and expand the Toolbox folder. Go to the Creative Assets section and drag a Display Set tile to the Audience icon. Then, drag the Video Set tile to the path.
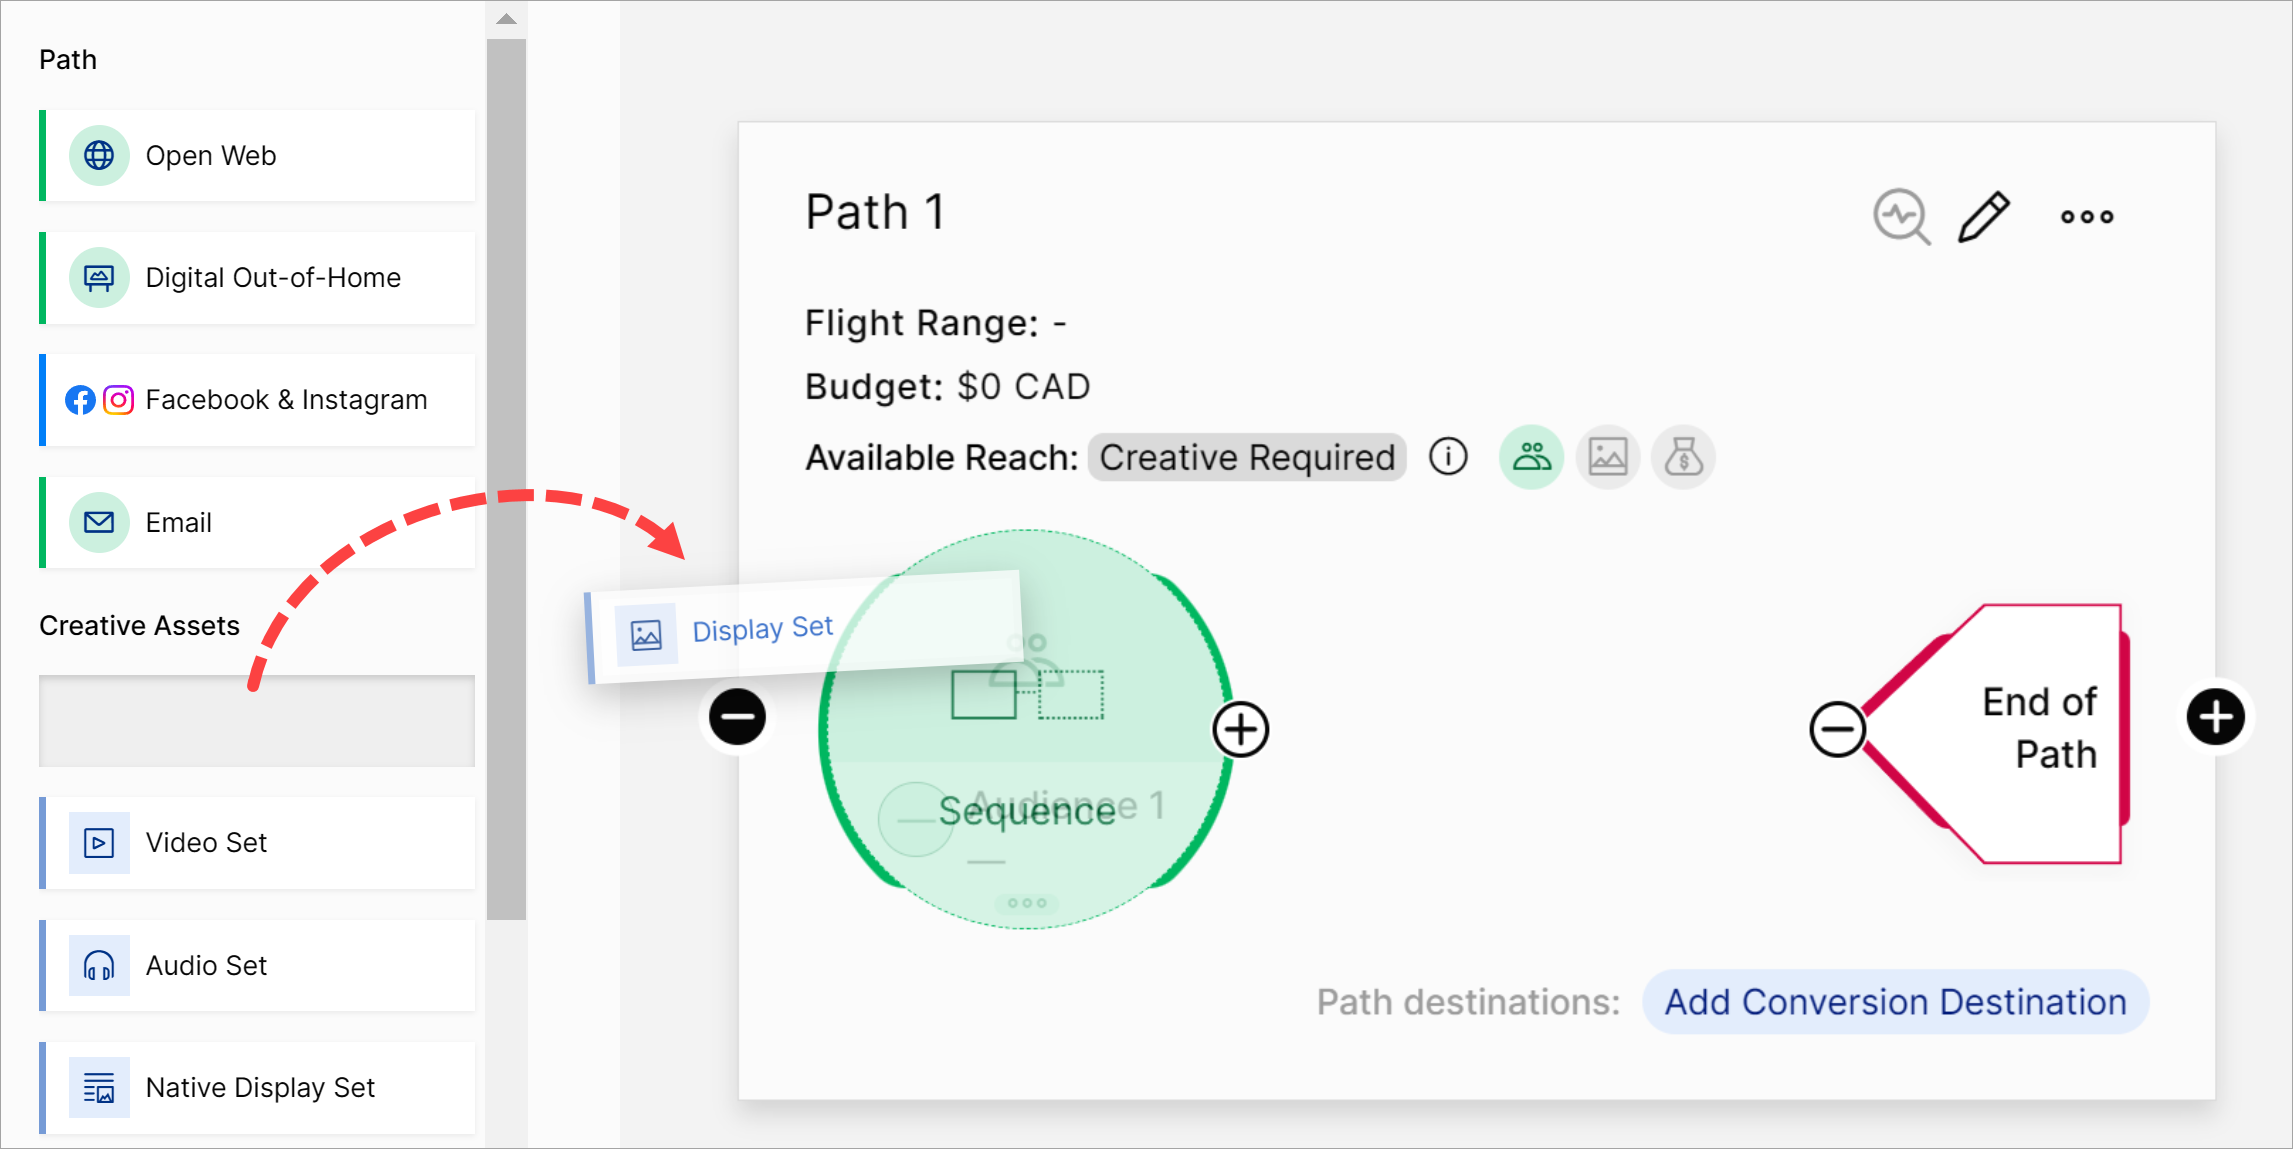
When you finish, the path should look something like this.
Deleting a placeholder
To remove a placeholder, click a placeholder one time. A side panel displays. Click the Delete button.
Adding assets and an audience
Next, go to the side menu and expand the Assets folder. Click the Creatives tab and drag a display asset to the Display placeholder. Repeat for the video asset. Then, click the Audiences tab and drag your audience to the Audience placeholder.
When you finish, you can see the audience size and the number of files in each creative placeholder.
Editing a creative or audience
To review or update an audience or creative, click a placeholder one time. A side panel displays. If you're inspecting a creative, click the Creatives tab. You have several options. For instance, you can check a box and delete the creative but keep the placeholder.

To edit an audience, click the bubble. In the side panel, you can change the audience name, remove the audience, or add a look-back window.
Adding conditions
Next, add a condition to each creative placeholder. A condition is a filter that passes qualified users to the next stage in the funnel. I'll add one condition to each creative.
Go to the side menu, expand the Toolbox folder, and locate the Conditions section. Drag the Impressions tile to the inside of the Display placeholder. An orange diamond displays. Next, drag a Video View tile to the inside of the Video placeholder.
- BTW, we'll add a Clicks condition in a different stage when we set up the conversion path.
When you finish, the path looks something like this.
Adding conditional values
Now, add a value to each condition. Click a display diamond to open the side panel. In the side panel, go to the Condition Settings field. Enter the number of display views (i.e. impressions) that must be achieved before the user moves to the next stage. I enter 2. I also check the Audience-Out box to enable this feature and click Update. If enabled, illumin collects the audience users who were served the impression or completed one of the assigned conditions. You can add that segment to a different journey for targeting.
Repeat the steps for the video condition. In this demo, I set the Condition Settings value for the video to one completed view. Remember, you can configure what constitutes a "completed" video view on the Journey Settings > Journey Stages page.
When complete, notice two changes on the path:
- Each condition diamond displays the number of required views.
- A small icon indicates an Audience Out.
To complete the condition work on this path, I drag the connector line from each condition to the End of Path icon.
Customizing targeting parameters
If you read the article about advertisers, you might recall that you can configure targeting at the advertiser level and on the canvas. When you create a multi-stage campaign on Journey Canvas, illumin auto-imports the targeting settings configured at the advertiser level.
You can override those settings at the path and creative levels. Here's how.
1 Campaign level
To review or update campaign-level targeting parameters, go to the stage menu bar and click the pencil icon. Click the Open Web & DOOH targeting link in the side menu. Scroll through the list of parameters and configure settings as required. illumin auto-applies the changes you make here to all paths on the canvas.
2 Creative level
To customize targeting for a specific creative, click the creative placeholder one time. A side panel displays. Click the Targeting tab. Scroll through the list, select a parameter, and click Edit. Uncheck the Keep journey targeting settings box. Customize settings for this creative.
If you leave the window, illumin auto-saves the changes. Optionally, you can apply the same change(s) to one or more creatives or paths.
- Don't leave the window.
- Scroll down and click the Apply to other steps button.
- On the next window, use the checkboxes to select one or more creatives and paths that should use the same new configuration.
- Click Apply.
Managing budget and scheduling
Next, set a budget and schedule for the path.
- FYI, when you build a multi-stage, multi-path campaign, each path has its own independent budget.
Click any blank spot on the path to open a side panel. Go to the Budget & Scheduling heading and click Edit. Scroll down and click the Add New Flight Range link.
Fill in the fields.
- Click the two flight range fields and set the start and end dates and times.
- Enter a maximum budget for the period.
- The default setting for Pacing is Even. That setting tells the algorithm to spend the budget evenly across the flight. There's no need to change that setting right now.
- Leave the Unspent Delivery default unchanged.
- Click Add and then Save.
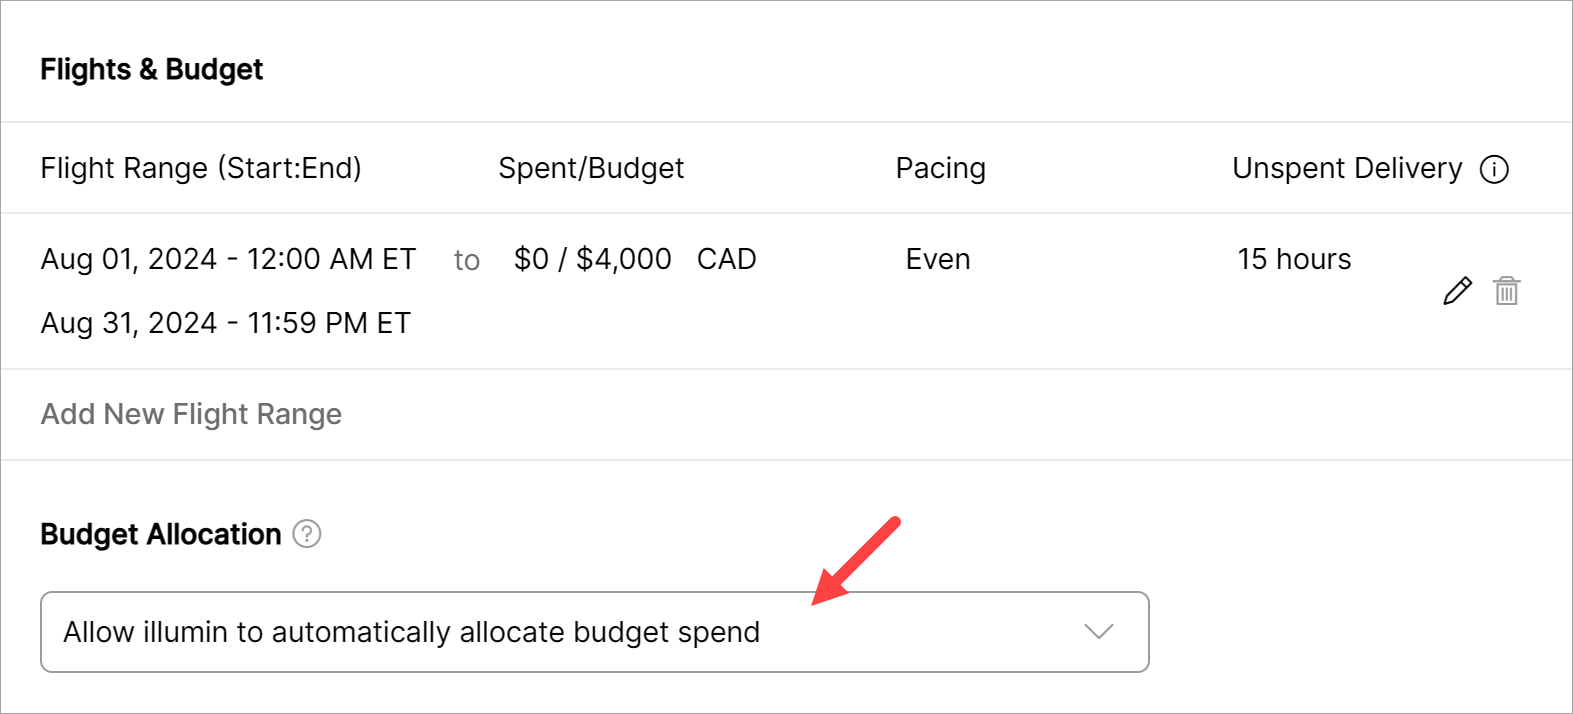
Budget allocation
This is an important step if you have multiple creative steps on one path. How do you allocate the budget between creative steps or creative types? In this example, my campaign budget is $4,000 CAD. The best option is to use the default setting and let illumin work out the optimal budget spend.
Daypart Targeting
This feature lets you choose the time of day to display impressions. For now, I'll accept the default setting (Run ads all the time). Click Save.
So far, we've created a single path on one stage, added the assets, enabled conditions, and configured key settings. We could stop here, go to the second stage, and build the Engagement part of the funnel. Before moving on, let's spice up the Awareness stage by splitting publishers into two paths.
I'll show you how to quickly create two paths: one for RTB publishers and a separate path for Deals. Why split 'em up? Well, because we can't target both types of inventory on the same path. Splitting helps us get granular data. The better the data, the better decisions you can make about campaign effectiveness.
To set up our paths, we'll use the Clone tool and then tweak some targeting settings.
Step 1 Clone a path
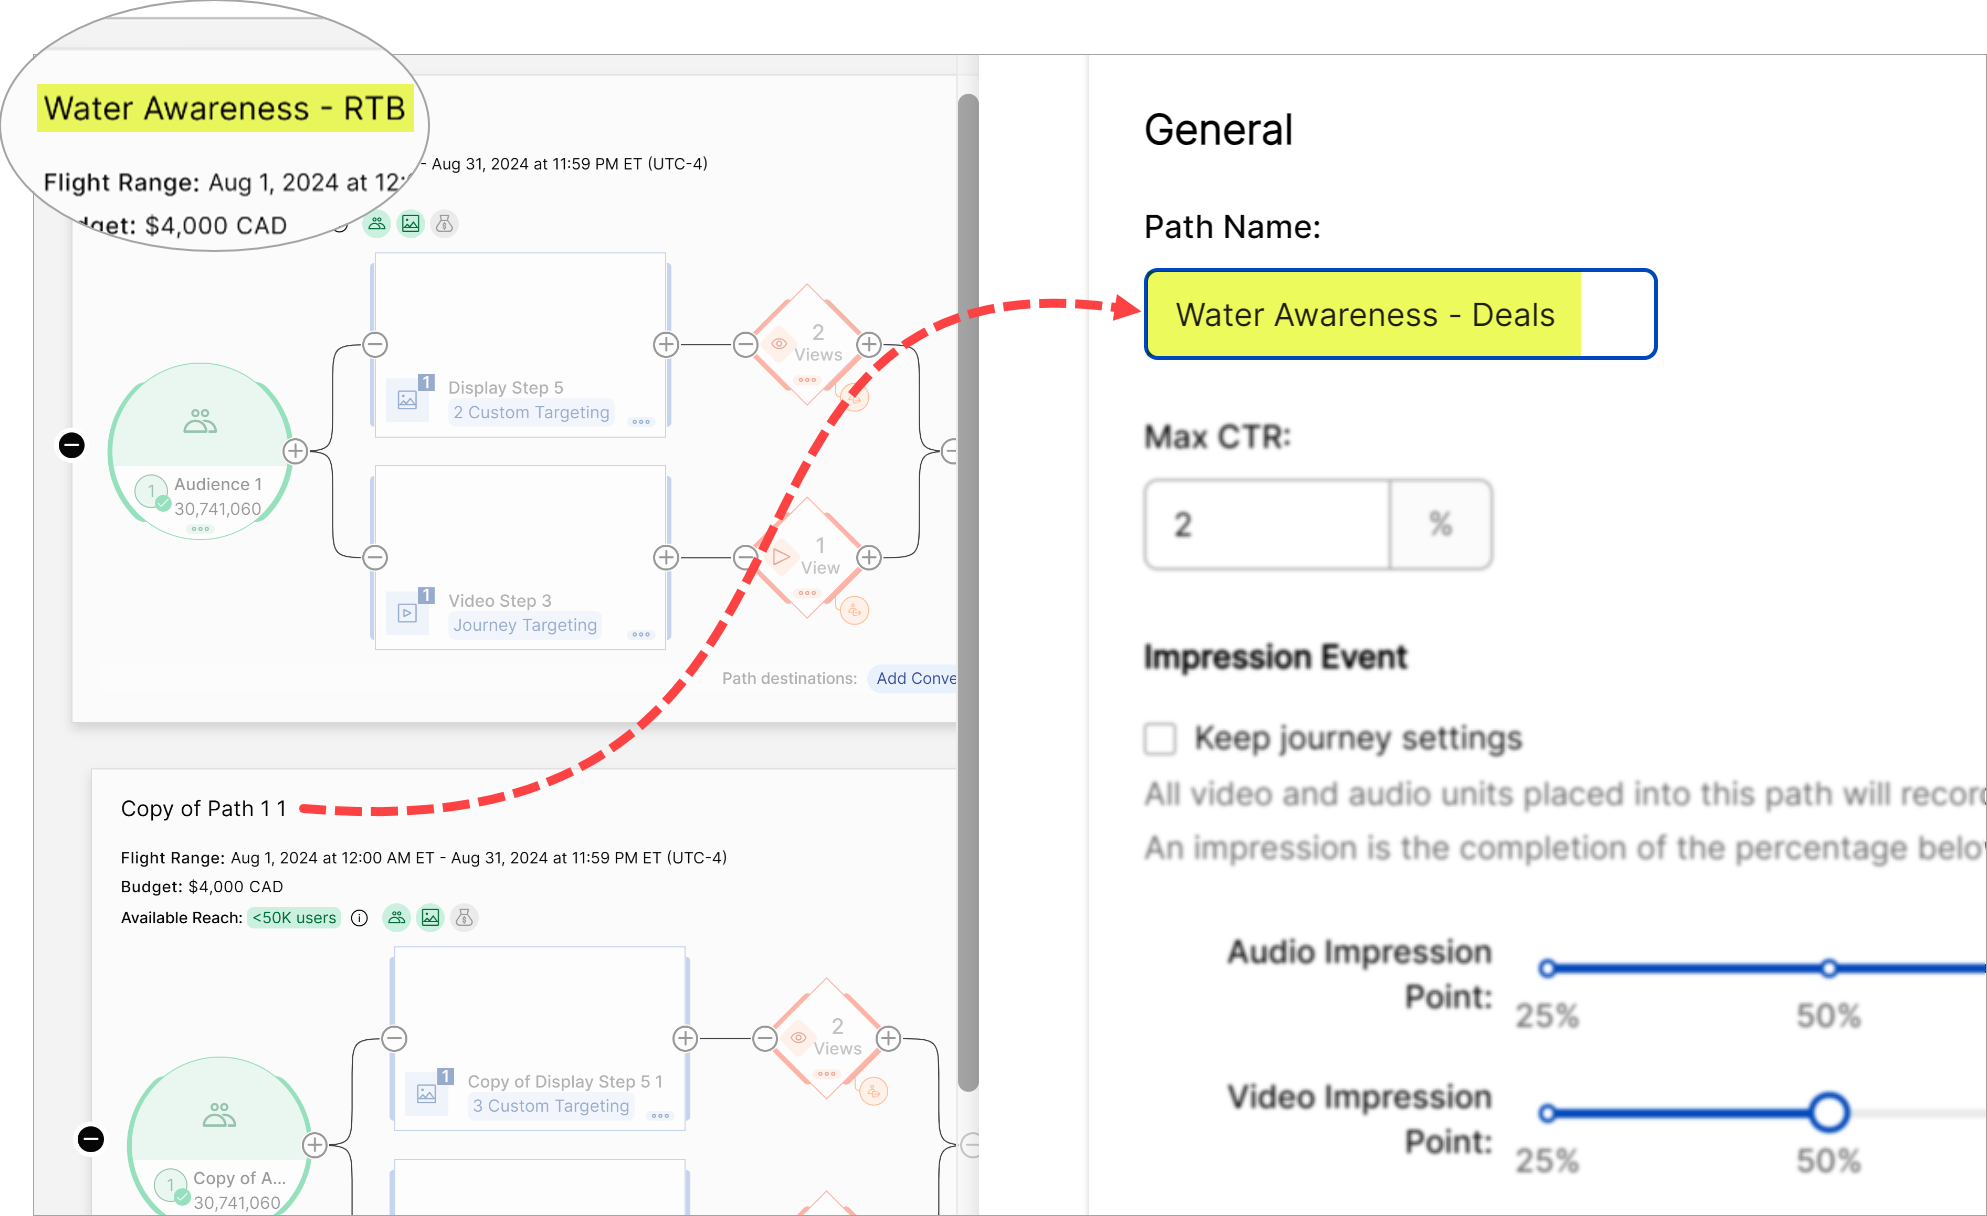
Select a path and click the three-dot icon in the top right corner. Click Clone. The canvas creates a copy of the path and its settings. To avoid confusion, let's rename each path.
- Go to a path and click the pencil icon. A side panel displays.
- Go to the General Settings heading and click Edit.
- Enter a new name RTB.
- Scroll down and click Save.
- Click the Close button.
- Repeat the steps to rename the other path Deals.
Step 2 Configure the Deals parameter
Next, enable Deals in the Deals path.
- Go to the deals path and click the Display placeholder. A side panel displays.
- Click the Targeting tab.
- Scroll down to the Deals heading and click Edit.
- Uncheck the Keep journey targeting settings box.
- Click the Add Deal(s) button.
- In the popup window, check the box next to Deal Name to select all.
- Click the Add Selected button.
On the next window, click the Save & Apply to other steps button. In the next window, select the other creative in this path. In my demo, that other creative is the video. Click Apply.
To verify the changes, click the Display placeholder in the Deals path. Click Targeting in the side panel. The Deals heading shows 21 allowed, which is correct. Repeat the steps for the video creative, and you should see the same Deals number. If you do the same Targeting test for the RTB creatives in the other path, the side panel should display 0 allowed for Deals.
Step 3 Revise the budget
The final step is to review the budget. Our budget is $4000 for the month. When we cloned the original path, the budget amount was also copied. Now each path has a $4000 budget. Not good.
- Go to the first path and click an empty spot. A side panel displays.
- Go to the Budget & Scheduling heading and click Edit.
- Go to the Flights & Budget field and click the pencil icon.
- Change the budget to the correct amount (i.e. $2000).
- Click Update > Save > Close.
- Repeat steps for the other path.
Once complete, verify the numbers in the paths and the stage. In the screenshot below, the stage total is $4000, and the total for one path is $2000; both numbers are as expected.
Building out the funnel
You made it this far! Well done. Now, you know how to find and use Journey Canvas building blocks. Use that knowledge to build paths on the Engagement and Conversion stages.
Publishing and reporting
Publishing and reporting are the two final steps. The Journey Canvas Quickstart guide discusses these topics.